
Crestron XiO Integration Guide
This document serves as a comprehensive guide that outlines the steps required to integrate Crestron devices with the NetSpeek platform via Crestron XiO Cloud.
Note
There are two paths for integrating Crestron devices with NetSpeek – the XiO Cloud integration, and the CresNext integration at a device’s local IP address documented at Crestron CresNext Integration Guide. Some organizations may want to use one method or the other, while some may want to orchestrate Crestron devices in their environment with both methods in parallel. Contact your NetSpeek representative to discuss this decision in more detail.
Prerequisites
Before beginning the integration, confirm the following:
- Crestron devices are already enrolled in Crestron XiO Cloud and connected to your organization.
- You have Global Administrator (or equivalent permissions required by Crestron to enable API access) to your XiO Cloud portal.
- You have access to your NetSpeek tenant with permission to manage Integrations.
- XiO Cloud API access is licensed for your account (commonly referenced as the SKU identifier SW-XIOC-API; confirm with Crestron or your distributor).
- XiO Cloud Premium is required for some API capabilities – confirm your organization’s current entitlements with Crestron if necessary.
Step 1. Enable XiO Cloud API access and generate credentials
Crestron’s Enable API Access documentation guides the XiO Cloud administrator through enabling the public REST API. This NetSpeek integration guide assumes devices are already enrolled and operational in XiO Cloud – the steps below describe how to enable the necessary API settings (or verify they are already enabled) in XiO Cloud.
In the XiO Cloud web portal (logged in with Global Administrator permissions):
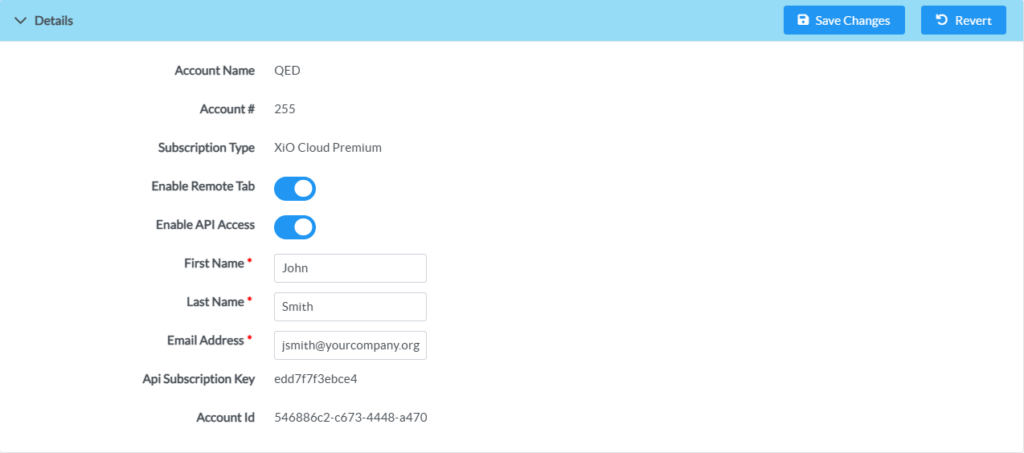
- Open Settings (gear) → Account Settings → Profile.
- Expand Details.
- Turn on Enable API Access.
- Enter the administrator name and email when prompted.
- Select Save Changes. Copy the Api Subscription Key when shown.
- Copy/store your XiO Account ID (issued with API onboarding, and shown in the portal as per the example image below) as this will also be needed for the NetSpeek configuration in the following step.
If self-service configuration of Enable API Access is unavailable, contact Crestron Technical Support (or your Crestron representative) to enable API access for your XiO Cloud tenant.
Store the Api Subscription Key and Account Id according to your organization’s policies – they will need to be entered into your NetSpeek tenant in the following step.
Step 2. Configure Crestron XiO Cloud in NetSpeek (Tenant Integration)
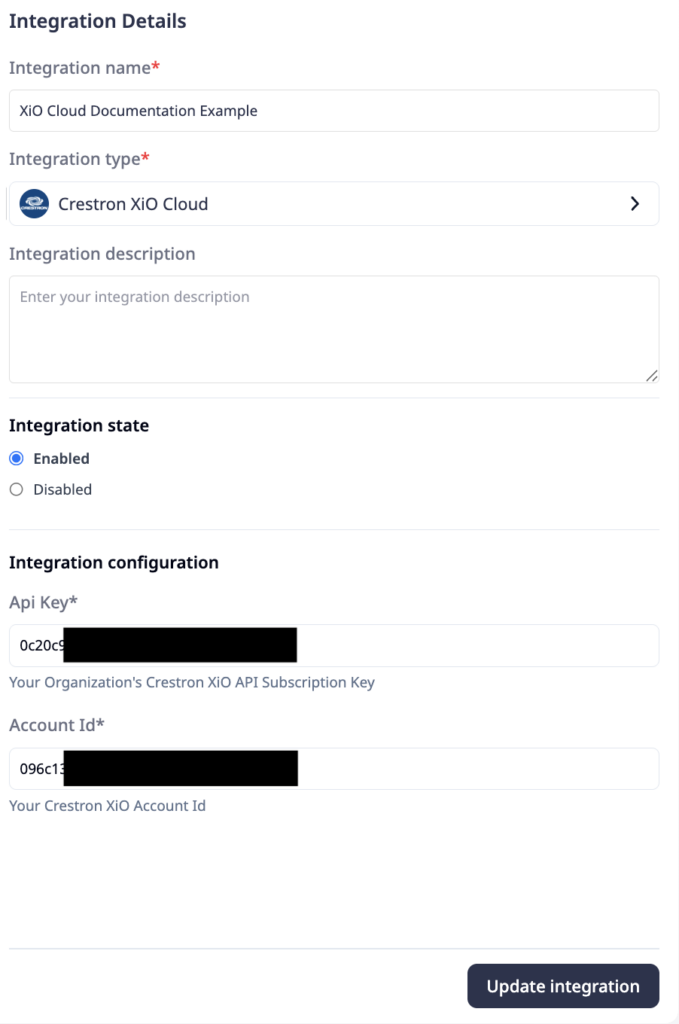
- In the NetSpeek portal, navigate to Tenant Management (settings cog icon)→ Integrations within your desired tenant (you may have access to multiple tenants / sub-tenants – if so, ensure you are configuring the integration in the proper place).
- Click “+ Add Integration”
- Enter an Integration Name (as an example format,
Crestron XiO – YourOrgName - YourTenantID). - Set Integration Type = Crestron XiO Cloud.
- (Optional) Enter an Integration description, with details other NetSpeek users may need to know.
- Set Integration State = Active.
- Enter the following configuration values:
- API Key: The XiO Api Subscription Key from Step 1
- Account Id: The XiO Account ID from Step 1
- Click Create new integration / Update integration.
Step 3. Add Device to NetSpeek Room Canvas
- In the NetSpeek Console, navigate to Room Management
- Select the room you wish to add your Crestron device to
- Click Launch Room Canvas
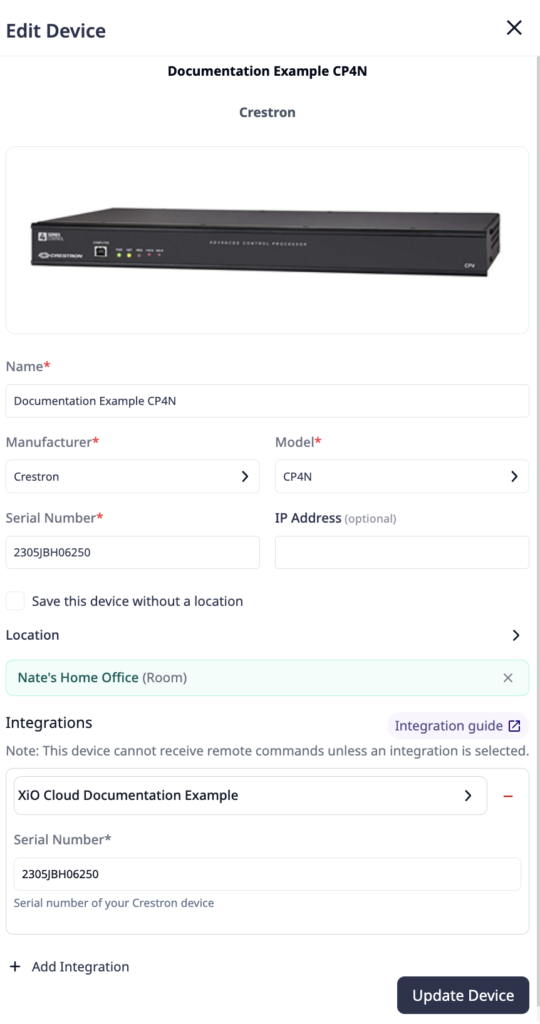
- Click Add device to room
- Choose your desired device from the manufacturer → device model list.
- Configure the appropriate values, and in the “Integrations” section, select the previously created XiO Cloud integration from Step 2.
- Serial Number (this is the only required parameter for XiO Cloud integration)
Verification
Once the relevant settings described above are configured, to validate the integration:
- Select a Crestron device in the NetSpeek console, open the Device Actions Tab, and select an available device action. It is generally advisable to test by dispatching a non-intrusive command such as a
Get Status. - On the device, observe the selected action occurring.
Support
If you run into any issues during onboarding or have questions, contact NetSpeek Support at support@netspeek.com.