
Microsoft Teams Integration Guide
This document serves as a comprehensive guide that outlines the steps required to integrate a Microsoft Teams environment with the NetSpeek platform.
Note
NetSpeek provides a specific software solution for orchestrating Windows OS devices, described at: https://docs.netspeek.ai/device-platform-integration-guides/netspeek-windows-runtime-service-documents/
The NetSpeek Windows Runtime Service may be considered for deployment in parallel to, or in place of, the method described in this guide, depending on your organization’s goals. Contact your NetSpeek representative to discuss this decision in more detail.
Prerequisites
Before beginning the integration, confirm the following:
- Microsoft Teams Room (MTR) systems are already enrolled in Microsoft Teams / Intune and connected to your organization.
- You have administrative access to your Microsoft environment, or know the identity of an administrator.
- You have access to your NetSpeek tenant with permission to manage Integrations.
Step 1: Configure Microsoft Teams in NetSpeek (Tenant Integration)
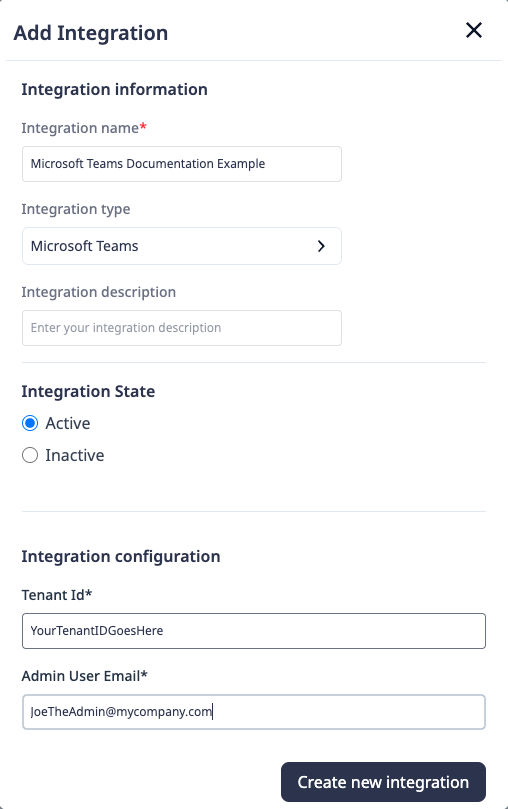
- In the NetSpeek portal, navigate to Tenant Management (settings cog icon)→ Integrations within your desired tenant (you may have access to multiple tenants / sub-tenants – if so, ensure you are configuring the integration in the proper place).
- Click “+ Add Integration”
- Enter an Integration Name (as an example format,
Microsoft Teams – YourOrgName - YourTenantID). - Set Integration Type = Microsoft Teams
- (Optional) Enter an Integration description, with details other NetSpeek users may need to know.
- Set Integration State = Active.
- Enter the configurations for:
- Tenant ID (your Microsoft Entra tenant ID).
- Admin User Email (the Microsoft 365 Global Admin who will approve the permission request shown in the next step).
- Click Create new integration / Update integration.
Microsoft Documentation: Finding your Microsoft Entra tenant ID
Step 2: Approve Permissions (Admin Consent)
- After you complete Step 1, NetSpeek will email your configured Microsoft Administrator a secure link.
- This link leads to a Microsoft-operated permissions management page where the permissions the NetSpeek Connector app is requesting are enumerated.
- Review the requested permissions and click Accept.
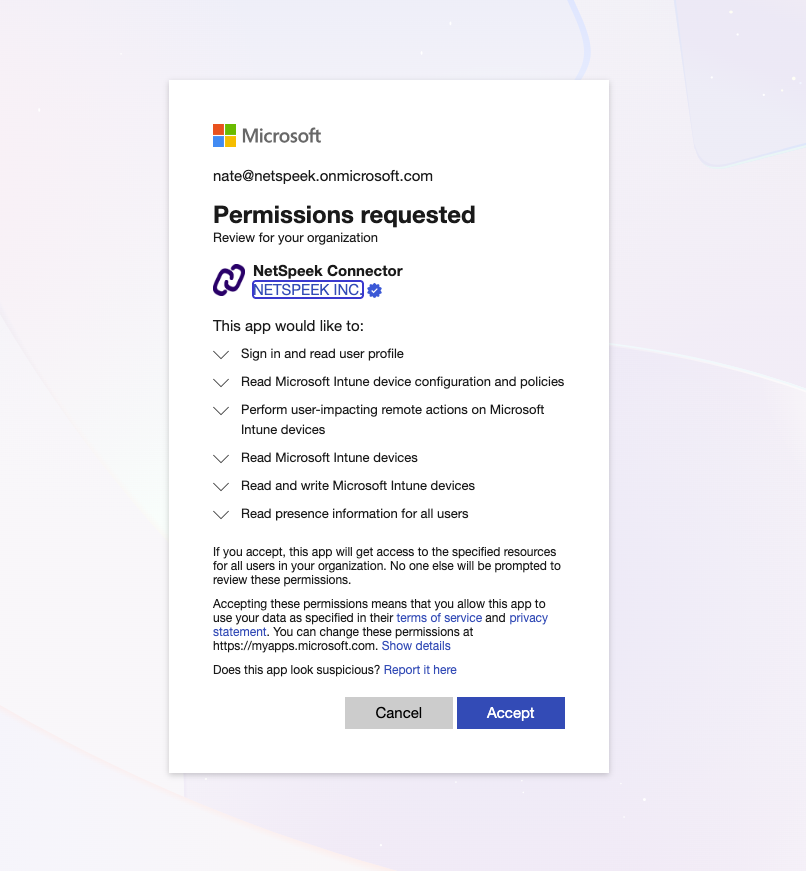
Actions Performed → Permissions Required
The table below describes the technical detail related to the permissions request shown in the image above.
| Action Name | Description | API used | Required Permissions |
|---|---|---|---|
| REBOOT_DEVICE | Restarts a Windows device remotely for maintenance and update application | Intune | DeviceManagementManagedDevices.Read.AllDeviceManagementManagedDevices.PrivilegedOperations.All |
| GET_STATUS | Retrieves comprehensive device health information including power status, network status, system resources, updates, peripheral health, and Teams sign-in information | Intune/Teamwork Communications | DeviceManagementManagedDevices.Read.All Presence.Read.All |
| GET_TEAMS_DEVICE_OPERATIONS | Retrieves device compliance policy states and operation history to monitor device compliance status | Intune | DeviceManagementManagedDevices.Read.All DeviceManagementConfiguration.Read.All |
Microsoft Documentation: Grant admin consent
Note
The email containing the admin consent link described above will come from donotreply@netspeek.com – please ensure email security systems allow that address to send messages that arrive unmodified to your administrator.
When connecting your Microsoft Teams environment to the NetSpeek application, you must sign in using a user account with administrative rights for the Microsoft tenant you wish to grant access to.
Only tenant administrators have the necessary permissions to approve and authorize the NetSpeek Connector app.
Step 3: Confirm Enterprise Application Settings
After granting consent:
- Log in to the Microsoft Entra Admin Center.
- Navigate to: Enterprise Applications → All applications.
- Verify that NetSpeek Teams Integration appears in the list.
- Ensure User assignment required? is set correctly (disabled or assigned to specific resource accounts as needed).
Microsoft Documentation: Manage enterprise app settings
Step 4: Apply Teams Application Access Policy
Your Teams environment requires a policy to allow the NetSpeek app to manage room calendars.
- Open PowerShell as Administrator.
- Run the following commands (replace placeholders where necessary):
Install-Module MicrosoftTeams
Connect-MicrosoftTeams
New-CsApplicationAccessPolicy `
-Identity "NetSpeekTeamsIntegration" `
-AppIds "{NETSPEEK-APP-ID}" `
-Description "Allow NetSpeek integration app"
# Option 1: Apply globally (all users/rooms)
Grant-CsApplicationAccessPolicy -PolicyName "NetSpeekTeamsIntegration" -Global
# Option 2: Apply per room mailbox (recommended)
Grant-CsApplicationAccessPolicy -Identity "ROOM_OBJECT_ID" -PolicyName "NetSpeekTeamsIntegration"
Microsoft Documentation: Configure app access to Teams resources
Step 5: Add Device to NetSpeek Room Canvas
- In the NetSpeek Console, navigate to Room Management
- Select the room you wish to add your Microsoft Teams Room system to
- Click Launch Room Canvas
- Click Add device to room
- Choose your desired device from the manufacturer → device model list.
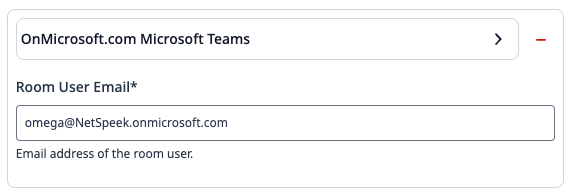
- Configure the appropriate values, and in the “Integrations” section, select the previously created Microsoft Teams integration.
- Configure the email address of the Room/User identity associated with this space.
Note
As Microsoft Teams is a Unified Communications platform integration with NetSpeek, it is associated on the Canvas with hardware devices manufactured by other organizations, as shown in the example image above. Typically the device will have multiple integrations simultaneously – the hardware manufacturer’s integration method(s), and an additional integration for Microsoft Teams as the UC platform.
Verification
Once the relevant settings described above are configured, to validate the integration:
- Select a Microsoft Teams Room device in the NetSpeek console, open the Device Actions Tab, and select an available device action. It is generally advisable to test by dispatching a non-intrusive command such as a
Get Status. - On the device, observe the selected action occurring.
Note
Ensure the command used for verification testing is a Microsoft Teams Room command using the Microsoft Teams integration, and not a hardware command using the hardware vendor’s integration.
Permissions Requested → Business Outcome Justification
The table below describes operational value and outcomes related to the permissions requested by this integration procedure.
| Permission | Business Justification |
|---|---|
| DeviceManagementManagedDevices.Read.All | Essential for device monitoring and health reporting – Required to retrieve device status, health metrics, diagnostic information, and compliance data from Intune-managed Windows devices. This enables proactive device monitoring and troubleshooting capabilities. |
| DeviceManagementManagedDevices.ReadWrite.All | Required for device synchronization and update management – Necessary to trigger device sync operations and manage software updates. This ensures devices stay current with security patches and software updates. |
| DeviceManagementManagedDevices.PrivilegedOperations.All | Critical for device maintenance operations – Required to perform essential device management tasks such as device restarts, which are necessary for applying updates and resolving device issues. This permission enables remote device maintenance without physical access. |
| DeviceManagementConfiguration.Read.All | Necessary for compliance monitoring – Required to read device compliance policy states and configuration information. This enables monitoring of device compliance status and identification of devices that may require attention or remediation. |
| Presence.Read.All | Required for Teams integration status reporting – Used to retrieve user presence information for Teams devices, enabling accurate reporting of device sign-in status and user activity for comprehensive device management dashboards. |
| User.Read (Delegated) | Standard authentication requirement – Basic permission required for user authentication and accessing user profile information. This is a standard Microsoft Graph permission used for secure API access. |
Support
If you run into any issues during onboarding or have questions, contact NetSpeek Support at support@netspeek.com.