
Poly Lens Integration Guide
This document serves as a comprehensive guide that outlines the steps required to integrate Poly Lens managed HP | Poly devices with the NetSpeek platform.
Note
There are two paths for integrating HP | Poly devices with NetSpeek – the Poly Lens integration described in this guide, and the VideoOS integration at a device’s local IP address. Some organizations may want to use one method or the other, while some may want to orchestrate HP | Poly devices in their environment with both methods in parallel. Contact your NetSpeek representative to discuss this decision in more detail.
Prerequisites
- Your HP | Poly devices are powered on, connected to the network, and registered to your Poly Lens tenant.
- You have administrative access to your Poly Lens tenant, in order to manage API Credentials (For details, see: Managing Poly Lens Users / Account Members).
- You have access to your NetSpeek tenant with permission to manage Integrations.
Step 1. Prepare the Poly Lens Environment
The Poly Lens documentation, such as the Video Devices Quick Start Guide instructs the HP | Poly device administrator through the various steps of tenant orchestration, such as managing users, configuring location hierarchy, and enrolling devices. There are many decision to make about Lens setup, and multiple methods of device enrollment to choose from – those configurations are out of the scope of this NetSpeek documentation. This guide assumes the necessary steps to use Poly Lens have been completed, and that NetSpeek-compatible devices are enrolled and operational in Poly Lens (not to be confused with NetSpeek Lena) before you proceed.
Step 2. Export Device Serial Numbers from Poly Lens
A. Filter devices in Lens
- Go to Poly Lens → Devices and create a view/filter showing Lens-enrolled devices to be enrolled in NetSpeek. See the Lens video device inventory documentation for guidance on available information.
B. Export Lens Device List
- Poly Lens supports CSV export of device lists from the Devices view — verify the exported file contains a Serial Number column, populated with your organization’s correct device serial numbers. See the Lens Import/Export File Guidance documentation for additional instructions, if needed.

Note
Poly Lens as of this document’s publication has two export workflows. This integration describes the “Devices Page / Inventory Export Workflow” and does NOT use the “Advanced Tools Export Workflow”.
NetSpeek has chosen to guide our customers to the Devices Page method in Lens, because the Advanced Tools method omits/excludes from the exported file some devices with some enrollment histories and provisioning configurations.
Step 3. Configure Poly Lens in NetSpeek (Tenant Integration)
A. Generate or retrieve Poly Lens API credentials
Obtain Client ID and Client Secret via Poly Lens:
- Sign into the Poly Lens Portal
- Navigate to → Account → Your Organization Name → Settings
- Click API Credentials in the Left Sidebar
- You’ll then be met with the API Key Management Interface to create or select an existing API Key. Copy the Client ID and Client Secret, and store/document this information according to your organization’s policies.
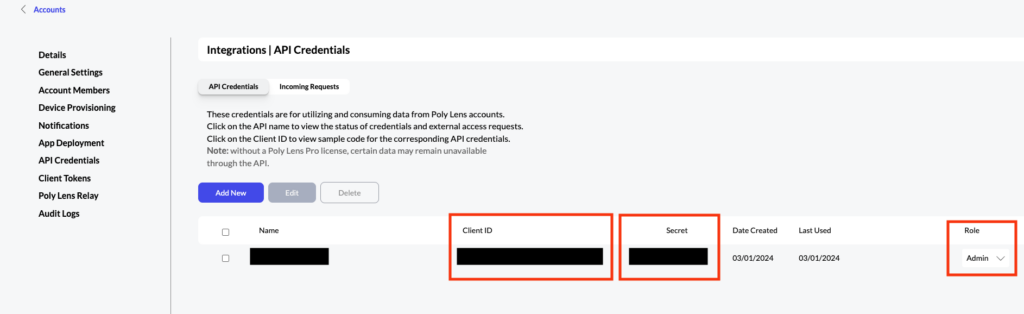
Make sure the API Credentials entity you choose has its Role set to Admin and store securely for later use. (If storing is undesired, it is possible to copy-paste immediately from the Lens interface to the NetSpeek interface without storing the API credentials in a file.)
B. NetSpeek: Configure the Poly Lens integration
- In the NetSpeek portal, navigate to Tenant Management (settings cog icon)→ Integrations within your desired tenant (you may have access to multiple tenants / sub-tenants – if so, ensure you are configuring the integration in the proper place).
- Click “+ Add Integration”
- Enter an Integration Name (as an example format,
Poly Lens – YourOrgName - YourTenantID). - Set Integration Type = Poly Lens.
- (Optional) Enter an Integration description, with details other NetSpeek users may need to know.
- Set Integration State = Active.
- Enter the Client ID and Client Secret values from your Poly Lens tenant.
- Click Create new integration / Update integration.

Step 4. Add Device to NetSpeek Room Canvas
- In the NetSpeek Console, navigate to Room Management
- Select the room you wish to add your HP | Poly Device to
- Click Launch Room Canvas
- Click Add device to room
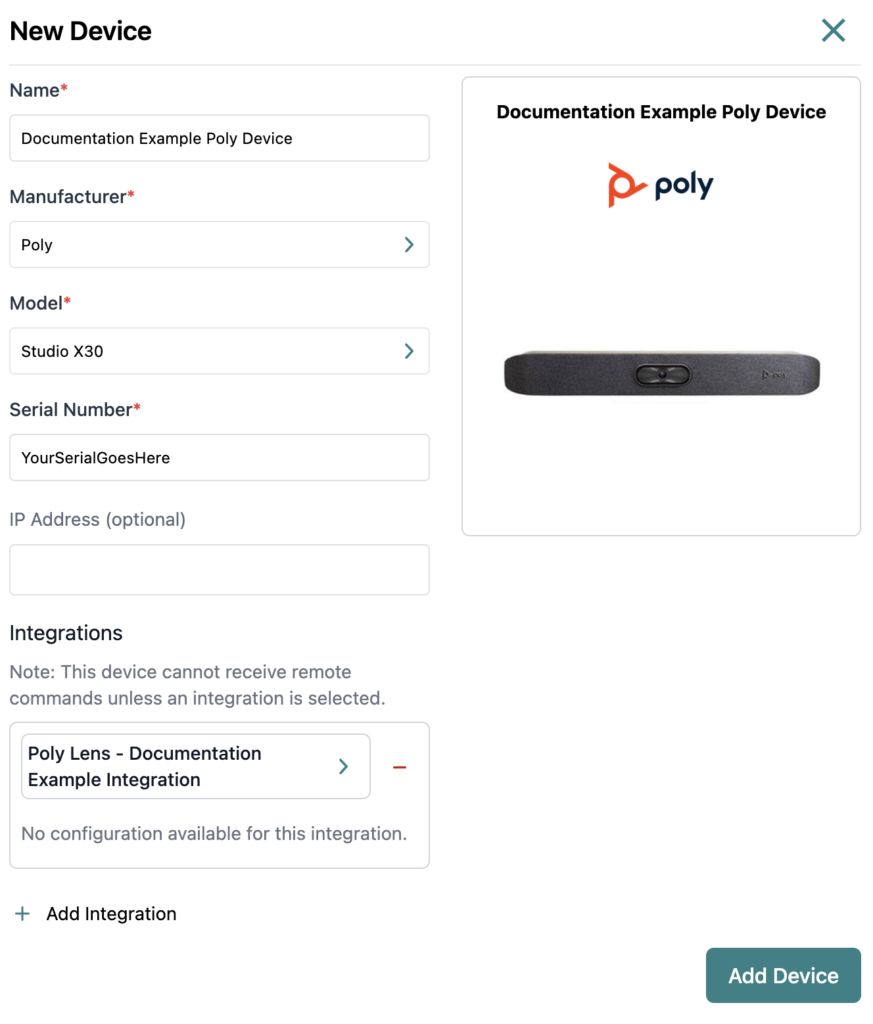
- Choose your desired device from the manufacturer → device model list.
- Configure the appropriate values, and in the “Integrations” section, select the previously created Poly Lens integration from Step 3.
- Serial Number (from the export of Poly Lens information described in Step 2)
Note
For rooms with multiple pieces of HP | Poly hardware, the device and Serial Number exported from Poly Lens will need to be added individually to NetSpeek for each hardware item. For example, this means that an appliance such as an X30 must be added and saved, then a new device must be added to the NetSpeek Room Canvas for its controller such as a TC8.
Verification
Once the relevant settings described above are configured, to validate the integration:
- Select a Poly device in the NetSpeek console, open the Device Actions Tab, and select an available device action. It is generally advisable to test by dispatching a non-intrusive command such as a
Get Status. - On the device, observe the selected action occurring.
Additional details: Lens Device ID’s
The actual mechanism by which NetSpeek sends commands to devices through Poly Lens leverages a value in Lens called lens_device_id which NetSpeek has chosen to obscure for the avoidance of confusion. The NetSpeek integration uses the Serial Number value to query Lens for the associated lens_device_id value, thus it is necessary for Lens to respond accurately to this query for the NetSpeek integration with Poly Lens to operate as expected.
Support
If you run into any issues during onboarding or have questions, contact NetSpeek Support at support@netspeek.com.