
Zoom Integration Guide
This document serves as a comprehensive guide that outlines the steps required to integrate a Zoom tenant with the NetSpeek platform.
Prerequisites
Before beginning the integration, confirm the following:
- Zoom Room systems are already enrolled in Zoom and connected to your organization.
- You have adminstrative access to your Zoom tenant’s portal.
- You have access to your NetSpeek tenant with permission to manage Integrations.
Enabling Server-to-Server OAuth Authentication for Zoom
Step 1: Enable API Control on Zoom Rooms
- Sign in to the Zoom web portal.
- Go to:
Admin ➔ Room Management ➔ Zoom Rooms - Locate the Zoom Room to integrate*.
- Click the Settings gear icon.
- Scroll to the Devices section and enable Control System API.
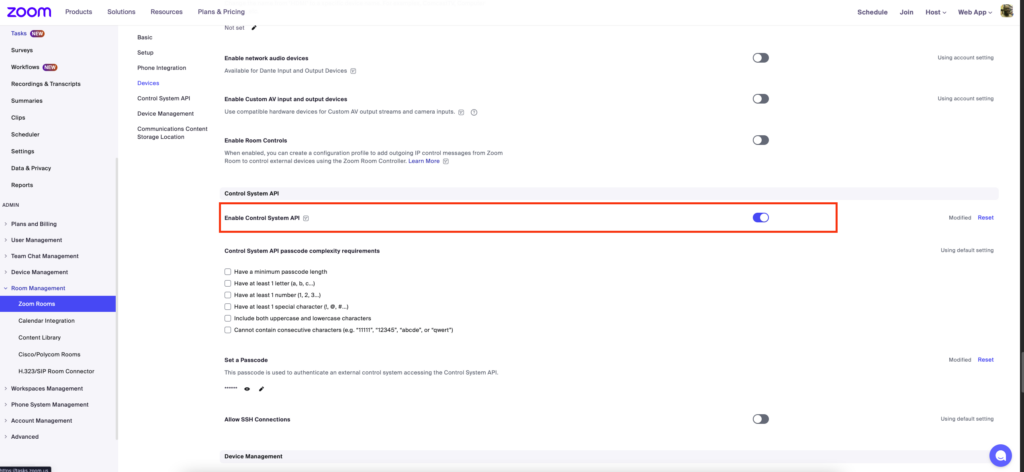
Note
The above example shows the Zoom Rooms Control System API being enabled for an individual room, and this configuration may be applicable to small-scale deployments, such as for a single Zoom Room being tested with NetSpeek integration before rolling out to more spaces.
To enable the Control System API, or any other Zoom Rooms capability, more quickly to a large number of rooms it is generally advisable to manage settings at an appropriate level of your Zoom hierarchy (such as a region, building, floor, or other) or to enable the setting at the account level. See Zoom’s documentation on this hierarchy here: https://support.zoom.com/hc/en/article?id=zm_kb&sysparm_article=KB0063345
Step 2: Create a Server-to-Server OAuth App in Zoom Marketplace
- Go to the Zoom App Marketplace.
- Sign in with the credentials of an administrator for your Zoom account/tenant.
- Select Develop ➔ Build App.
- Choose Server-to-Server OAuth and click Create.
- Give the integration (app) a name in the Zoom App MarketPlace, and enter data in sections of the following workflow pages such as developer contact information, company details, and most importantly the Scopes described in Step 3.
Step 3: Assign Required Scopes
To allow NetSpeek to effectively manage Zoom Rooms, devices, and meeting details, specific scopes must be enabled on the Zoom OAuth app. These scopes authorize the required read/write access to perform automation, diagnostics, room control, and reporting functionalities.
Assign the following scopes to the application (you may want to copy-paste the scope text below into the Add Scopes pop-up in the workflow):
Devices
| Scope | Description |
|---|---|
device:read:zdm_device:master | Read device |
device:read:zdm_device:admin | Read device |
device:read:list_zdm_devices:admin | List devices |
device:read:list_zdm_devices:master | List devices |
device:read:list_groups:admin | List groups |
device:read:list_groups:master | List groups |
Devices (H.323)
| Scope | Description |
|---|---|
h323_device:read:list_devices:admin | View H.323 devices |
h323_device:update:device:admin | Update or edit H.323 device |
h323_device:delete:device:admin | Delete H.323 device |
h323_device:write:device:admin | Add new H.323 device |
Meeting
| Scope | Description |
|---|---|
meeting:read:past_meeting:admin | View a past meeting |
meeting:read:device:admin | View a meeting’s device test result |
meeting:read:list_past_instances:admin | View past meeting instances |
meeting:read:list_meetings:admin | View a user’s meetings |
meeting:read:invitation:admin | View meeting invitation |
meeting:read:participant:admin | View participants |
meeting:update:meeting:admin | Update a meeting |
meeting:delete:meeting:admin | Delete a meeting |
meeting:update:livestream_status:admin | Update livestream status |
meeting:write:meeting:admin | Create a meeting |
meeting:update:status:admin | Update meeting status |
meeting:write:invite_links:admin | Create invite links |
Room
| Scope | Description |
|---|---|
zoom_rooms:read:list_rooms:admin | View Zoom Rooms |
zoom_rooms:read:list_devices:admin | View Zoom Room devices |
zoom_rooms:update:room_controls:admin | Update room controls |
zoom_rooms:update:room_control:admin | Update specific control |
Step 4: Retrieve and Store App Credentials
Copy the following information from your Zoom Server-to-Server OAuth app, to be provided to NetSpeek for communication with your Zoom account, and store it according to your organization’s policies:
- Account ID
- Client ID
- Client Secret
Step 5: Configure Zoom in NetSpeek (Tenant Integration)
- In the NetSpeek portal, navigate to Tenant Management (settings cog icon)→ Integrations within your desired tenant (you may have access to multiple tenants / sub-tenants – if so, ensure you are configuring the integration in the proper place).
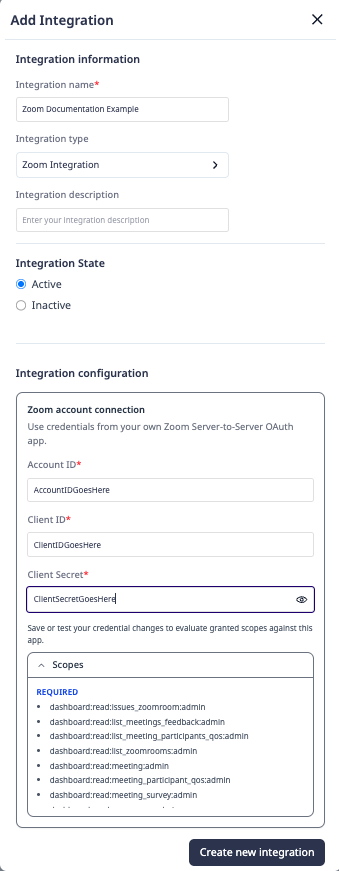
- Click “+ Add Integration”
- Enter an Integration Name (as an example format,
Zoom – YourOrgName - YourTenantID). - Set Integration Type =
Zoom Integration - (Optional) Enter an Integration description, with details other NetSpeek users may need to know.
- Set Integration State = Active.
- Choose an authentication mode – this guide describes the “Server to Server (your internal Zoom app)” method.
- Enter the Account ID, Client ID, and Client Secret information recorded in the prior step.
- Click Create new integration / Update integration.
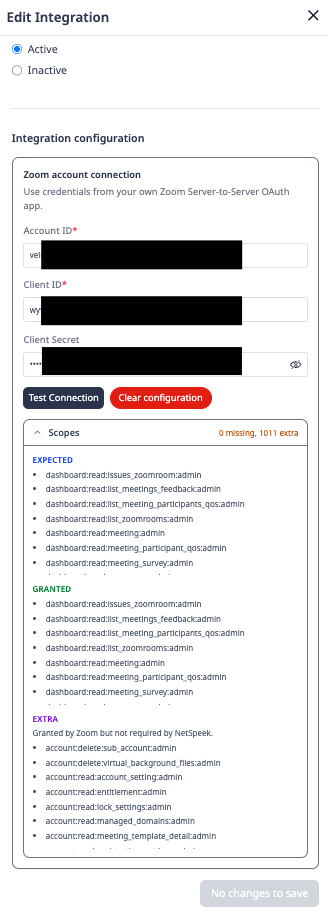
- Note that this interface can test the availability of application scopes – save the configuration and re-open it to view the results and to see any missing scopes. (An image showing an example test result is below.)
Step 6. Add Device to NetSpeek Room Canvas
- In the NetSpeek Console, navigate to Room Management
- Select the room you wish to add your Zoom Room system to
- Click Launch Room Canvas
- Click Add device to room
- Choose your desired device from the manufacturer → device model list.
- Configure the appropriate values, and in the “Integrations” section, select the previously created Zoom integration.
- Use the “Room Name” from the Zoom tenant.
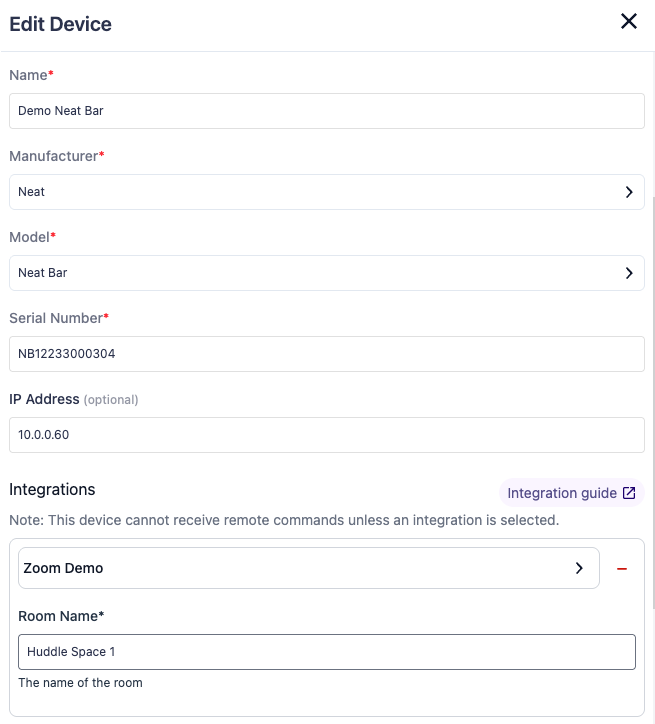
Note
As Zoom is a Unified Communications platform integration with NetSpeek, it is associated on the Canvas with hardware devices manufactured by other organizations, as shown in the example image above. Typically the device will have multiple integrations simultaneously – the hardware manufacturer’s integration method(s), and an additional integration for Zoom as the UC platform.
Verification
Once the relevant settings described above are configured, to validate the integration:
- Select a Zoom Room device in the NetSpeek console, open the Device Actions Tab, and select an available device action. It is generally advisable to test by dispatching a non-intrusive command such as a
Get Zoom Room Status. - On the device, observe the selected action occurring.
Note
Ensure the command used for verification testing is a Zoom Room command using the Zoom integration, and not a hardware command using the hardware vendor’s integration.
Support
If you run into any issues during onboarding or have questions, contact NetSpeek Support at support@netspeek.com.