
Crestron CresNext Integration Guide
This document serves as a comprehensive guide that outlines the steps required to integrate Crestron CresNext-capable devices with the NetSpeek platform.
These device families include:
- DM-NVX and DM-NAX Series
- HD Series switchers
- 4-Series processors
- TSW-70 touch panels
- AirMedia 3 Series
- USB-SW Series
- CEN-ODT occupancy sensors
For specifics about the exact device models supported, see the Crestron section of NetSpeek Supported Devices and Controls.
Note
There are two paths for integrating Crestron devices with NetSpeek – the Crestron XiO Cloud integration found at <link to XiO integration guide coming soon!>, and the CresNext integration at a device’s local IP address documented on this page. Some organizations may want to use one method or the other, while some may want to orchestrate Crestron devices in their environment with both methods in parallel. Contact your NetSpeek representative to discuss this decision in more detail.
Prerequisites
Before beginning the integration, confirm the following:
- Your Crestron device is powered on and connected to a network that is routable to/from your NetSpeek Edge.
- You have deployed a NetSpeek Edge VM as described here: https://docs.netspeek.ai/netspeek-edge-installation-guide/
- Note: This integration requires an Edge VM running software version
1.3.2or later.
- Note: This integration requires an Edge VM running software version
- Device firmware should meet Crestron’s CresNext API baseline for that product family (or newer), for example:
- DM NVX 7.3.5+
- DM NAX 4.1+
- HD-MD 1.2.4671.00060+
- HD-PS 1.3.4790.00028+
- 4-Series 2.8003.00056.01+
- TSW-70 3.002.0034.001+
- AirMedia 3 3.0800.0157+
- USB-SW 1.000.5670.00019+
- CEN-ODT 3.0000.00018+.
- You have CresNext authentication credentials for the device (username and password).
- Ensure firewalls allow outbound TLS/HTTPS from the NetSpeek Edge to the Crestron device.
Step 1. Add Device to NetSpeek Room Canvas
Device Provisioning Flow
- In the NetSpeek Console, navigate to Room Management
- Select the room you wish to add your Crestron device to
- Click Launch Room Canvas
- Click Add device to room
- Choose your desired device from the manufacturer → device model list.
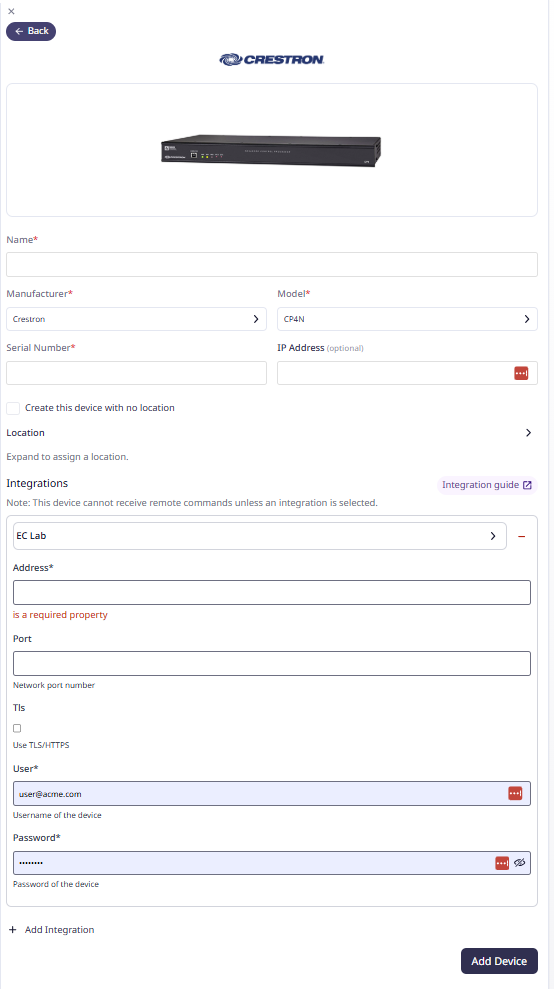
- Configure the appropriate values, and in the “Integrations” section, select a previously created NetSpeek Edge VM integration. Ensure that the Edge VM is on a network that can reach the device’s configured IP address.
- In the configuration panel, enter the following fields:
- Device IP Address (static/reserved IP, or DHCP)
- Username (CresNext login)
- Password (CresNext login)
- Port (optional; default 443)
- TLS (optional; default true / HTTPS)
Verification
Once the relevant settings described above are configured, to validate the integration:
- Select a Crestron device in the NetSpeek console, open the Device Actions Tab, and select an available device action. It is generally advisable to test by dispatching a non-intrusive command such as a
Get Status. - On the device, observe the selected action occurring.
Troubleshooting
Connection Issues
- Confirm the IP address is correct and routable from the network segment where the NetSpeek Edge VM is deployed.
- Ensure the port used is not blocked by firewall rules on the machine running your NetSpeek Edge VM.
- Confirm username/password are valid CresNext credentials for that device.
- Confirm device firmware meets the CresNext API baseline for that product family.
- Confirm the correct product family / model was selected so actions map to the correct CresNext target type (for example HD-PS vs DM-NVX).
- For HD matrix routes that appear ignored, check whether automatic routing is enabled on the switcher before relying on manual Set Matrix Route commands.
Support
If you run into any issues during onboarding or have questions, contact NetSpeek Support at support@netspeek.com.