
NetSpeek Windows Runtime Service Installation Guide for Microsoft Intune
This document is a step-by-step guide for installing and updating the NetSpeek Windows Runtime Service (NWRS) on a fleet of Windows OS computers, using Microsoft Intune. This guide is a companion document to NetSpeek Windows Runtime Service Integration Guide. The NWRS is initially distributed, and updated afterward, through Intune without the need to manually interact with the target PCs for this procedure (the distribution for individual-PC installation differs).
NWRS acts an on-premises component that listens for orchestration commands from your NetSpeek Edge VM and performs actions on its host PC (for example: display detection, system telemetry, OEM-specific commands, and other functionality).
Note
This guide is for installing NWRS on a fleet of PCs using Microsoft Intune.
For smaller-scale deployment where Intune is not available or not desired, see NetSpeek Windows Runtime Service Installation Guide for Individual Devices.
Prerequisites
Before beginning the deployment, confirm the following:
- The target compute systems/devices are running a 64-bit Windows OS version from the list below:
- Windows 10
- Note that only 64-bit OS’es are supported – the 32-bit version of Windows 10 is not supported.
- Windows 11
- Windows Server 2016 or later
- Windows 10
- These devices have the required dependencies installed:
- .NET Core 8.0 Runtime (v8.0.26) (or later)
- ASP.NET Core 8.0 Runtime (v8.0.27) (or later)
- The target devices are enrolled in your Microsoft Intune tenant and assigned to an Entra group.
- A Privileged Role Administrator in your Entra tenant is available to approve the required permissions.
- Intune can silently install applications (in this case the NWRS MSI) on the target PCs.
- Relevant software for your use case is installed on the PC.
Note
At present, the Intune deployment method for the NWRS will result in the service listening on port TCP 443, and does not provide a mechanism to define an alternate listening port. A feature to do this is in development but not yet available.
If an alternate listening port is required, this can can currently be specified exclusively via the manual installation process as described at NetSpeek Windows Runtime Service Installation Guide for Individual Devices.
Step 1. Tenant-level configuration and administrator consent
Sub-Integration Configuration
This step assumes an Edge VM is already deployed – the sub-integration is added as a configuration parameter to the Edge at the tenant level.
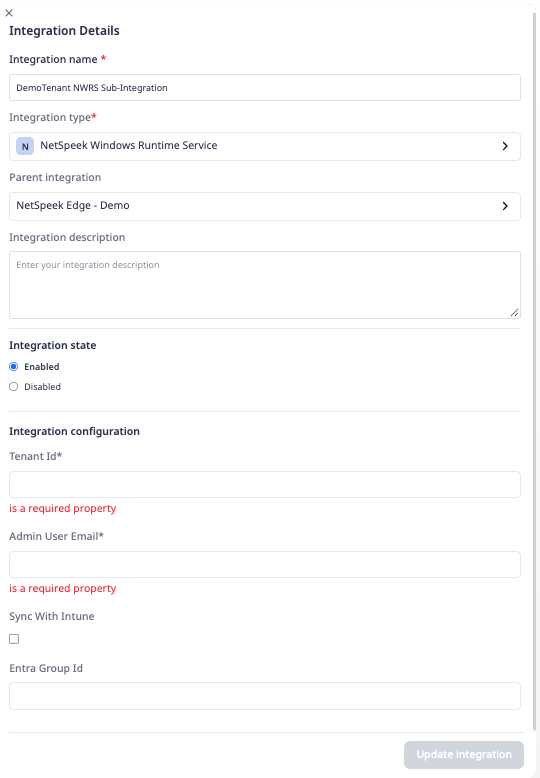
- Navigate to Settings → Tenant Management → Integrations
- Click Add Integration
- Choose the NetSpeek Windows Runtime Service integration type.
- Note that for integrations where a sub-integration applies (and only those integrations), a “Parent Integration” field is shown.
- Select the appropriate NetSpeek Edge VM to serve as the parent.
- To install and manage NWRS with Microsoft Intune, complete the following steps:
- Enter the Tenant ID for your Microsoft Entra directory.
- Enter the Admin User Email for your Microsoft tenant.
- Enable Sync with Intune.
- Enter the Entra Group ID for the devices where you want NWRS installed and managed.
- To add multiple device groups, separate each Group ID with a comma (for example:
<id-1>, <id-2>).
- To add multiple device groups, separate each Group ID with a comma (for example:
Sync with Intune – Admin Consent Procedure
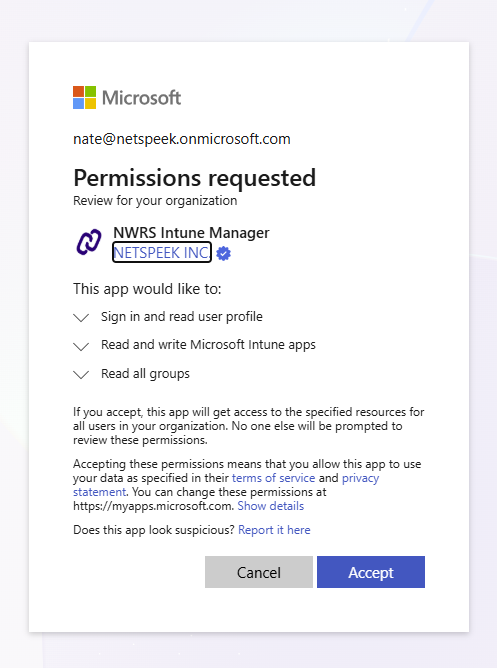
- After saving the integration, the defined Admin email account will receive an email from NetSpeek, with an invitation link to authorize the NWRS Intune Manager App published by NetSpeek to manage NWRS on your Intune-enrolled devices using the permissions shown below.
- The admin must open the invitation link from the email.
- On the permissions page, review the request and click Accept to grant access.
- After consent is granted, NetSpeek automatically creates the Win32 app and assigns it to the Entra Group(s) you selected earlier. The Intune Management Extension (IME) on those devices will then begin installing NWRS.
- The IME checks for NWRS updates published by NetSpeek every 8 hours. If a new version is available, the IME automatically installs the latest version.
Verification
Once the relevant settings described above are configured, to validate the installation:
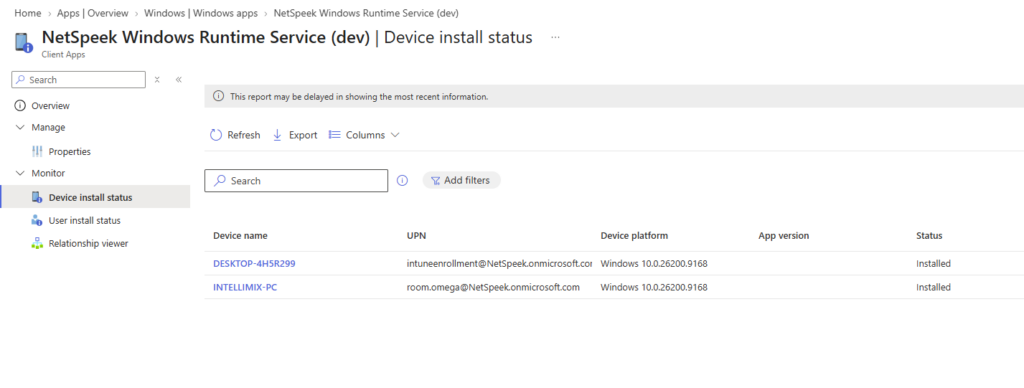
- Navigate to your Intune Admin Admin Center
- Go to Apps
- Select the NetSpeek Windows Runtime Service App
- Click Device Install Status
- Verify that the NWRS has installed successfully on all of your Windows devices
At this point the Intune installation workflow is complete – the remaining procedure is described in step 2 (“Add Device to NetSpeek Room Canvas”) of NetSpeek Windows Runtime Service Integration Guide.
Troubleshooting
Intune Installation or Update Issues
- Confirm the PC is enrolled in Intune. For additional help, see Troubleshoot device enrollment in Intune.
- Confirm a Privileged Role Administrator has granted admin consent. NetSpeek cannot create the Win32 app or begin installation until consent is granted.
- If Intune shows a Not applicable status, confirm the device meets the 64-bit requirement. Installation will begin once the device meets the required criteria.
Support
If you run into any issues during onboarding or have questions, contact NetSpeek Support at support@netspeek.com.