
NetSpeek Edge Installation Guide
This document guides an administrator through deploying the NetSpeek Edge VM, including environmental preparation, installation steps, and initial setup and registration to the NetSpeek cloud platform.
What is the NetSpeek Edge VM?
The NetSpeek Edge VM is a secure, virtual appliance designed to connect your local environment to the NetSpeek cloud platform. Acting as a bridge between your on-premises devices and the cloud, NetSpeek Edge VM enables devices orchestration without the need for dedicated hardware in every room or location.
Key Functions and Benefits
- Secure Connectivity: NetSpeek Edge VM establishes encrypted connections to the NetSpeek platform initiated by the Edge VM from within your network security boundaries, ensuring your network remains protected from unsolicited inbound traffic.
- Local Device Management: Deployed as a virtual machine within your hypervisor infrastructure, it can control, monitor, and orchestrate devices on your local network, such as displays, audio-visual equipment, power distribution systems, network switches, and more.
- Centralized Cloud Integration: All device commands, updates, and monitoring are orchestrated through NetSpeek’s cloud platform, providing a unified dashboard for management and troubleshooting.
- No NetSpeek Hardware Needed: Since NetSpeek Edge VM is entirely a software solution, there’s no need for specific physical gateway appliances – it runs on hardware and virtualization of your choice, and one Edge VM instance can orchestrate a multitude of devices across your network.
How It Works
- Deployment: NetSpeek Edge VM is delivered as a pre-configured virtual machine image (OVA format), compatible with most virtualization platforms.
- Registration: Once deployed and networked, it connects securely to your tenant in the NetSpeek cloud.
- Management: A local web interface is available for initial setup and troubleshooting, but most actions after the steps in this guide take place in the NetSpeek cloud web portal.
Installation Overview
To deploy and register your NetSpeek Edge VM, follow the steps in this guide in order. The guide includes descriptions of planning and prerequisites, deployment, configuration and registration, and validation.
1. Resource Specifications
Virtual Machine Hardware Requirements
To ensure optimal performance, your virtual machine (VM) must meet the following hardware specifications (hardware is allocated to the VM in your host/hypervisor):
Minimum System Specifications
These requirements represent the minimum recommended configuration for the Edge VM to function reliably:
- CPU: 2 vCPUs (64-bit processor)
- Memory (RAM): 4 GB
- Storage: 8 GB available disk space
Recommended Specifications for High Usage Environments
For environments with heavy workloads, the following configuration is recommended:
- CPU: 4 vCPUs
- Memory (RAM): 8 GB
- Storage: 20 GB available disk space
2. Software Preparation
Before installation, ensure the following:
- Virtualization platform / hypervisor is installed and running.
- You have admin access to the hypervisor to deploy/import a virtual machine.
- Outbound internet access is available for NetSpeek platform registration and delivery of software updates using the ports specified in Network and Firewall Requirements.
- NetSpeek Edge
.ovafile and Credentials CSV have been downloaded from your NetSpeek portal’s self-service VM download interface, as described below.
To download the Edge VM from your NetSpeek management portal, open a new Chat Tab and follow the instructions at the bottom of the page (highlighted in red below).
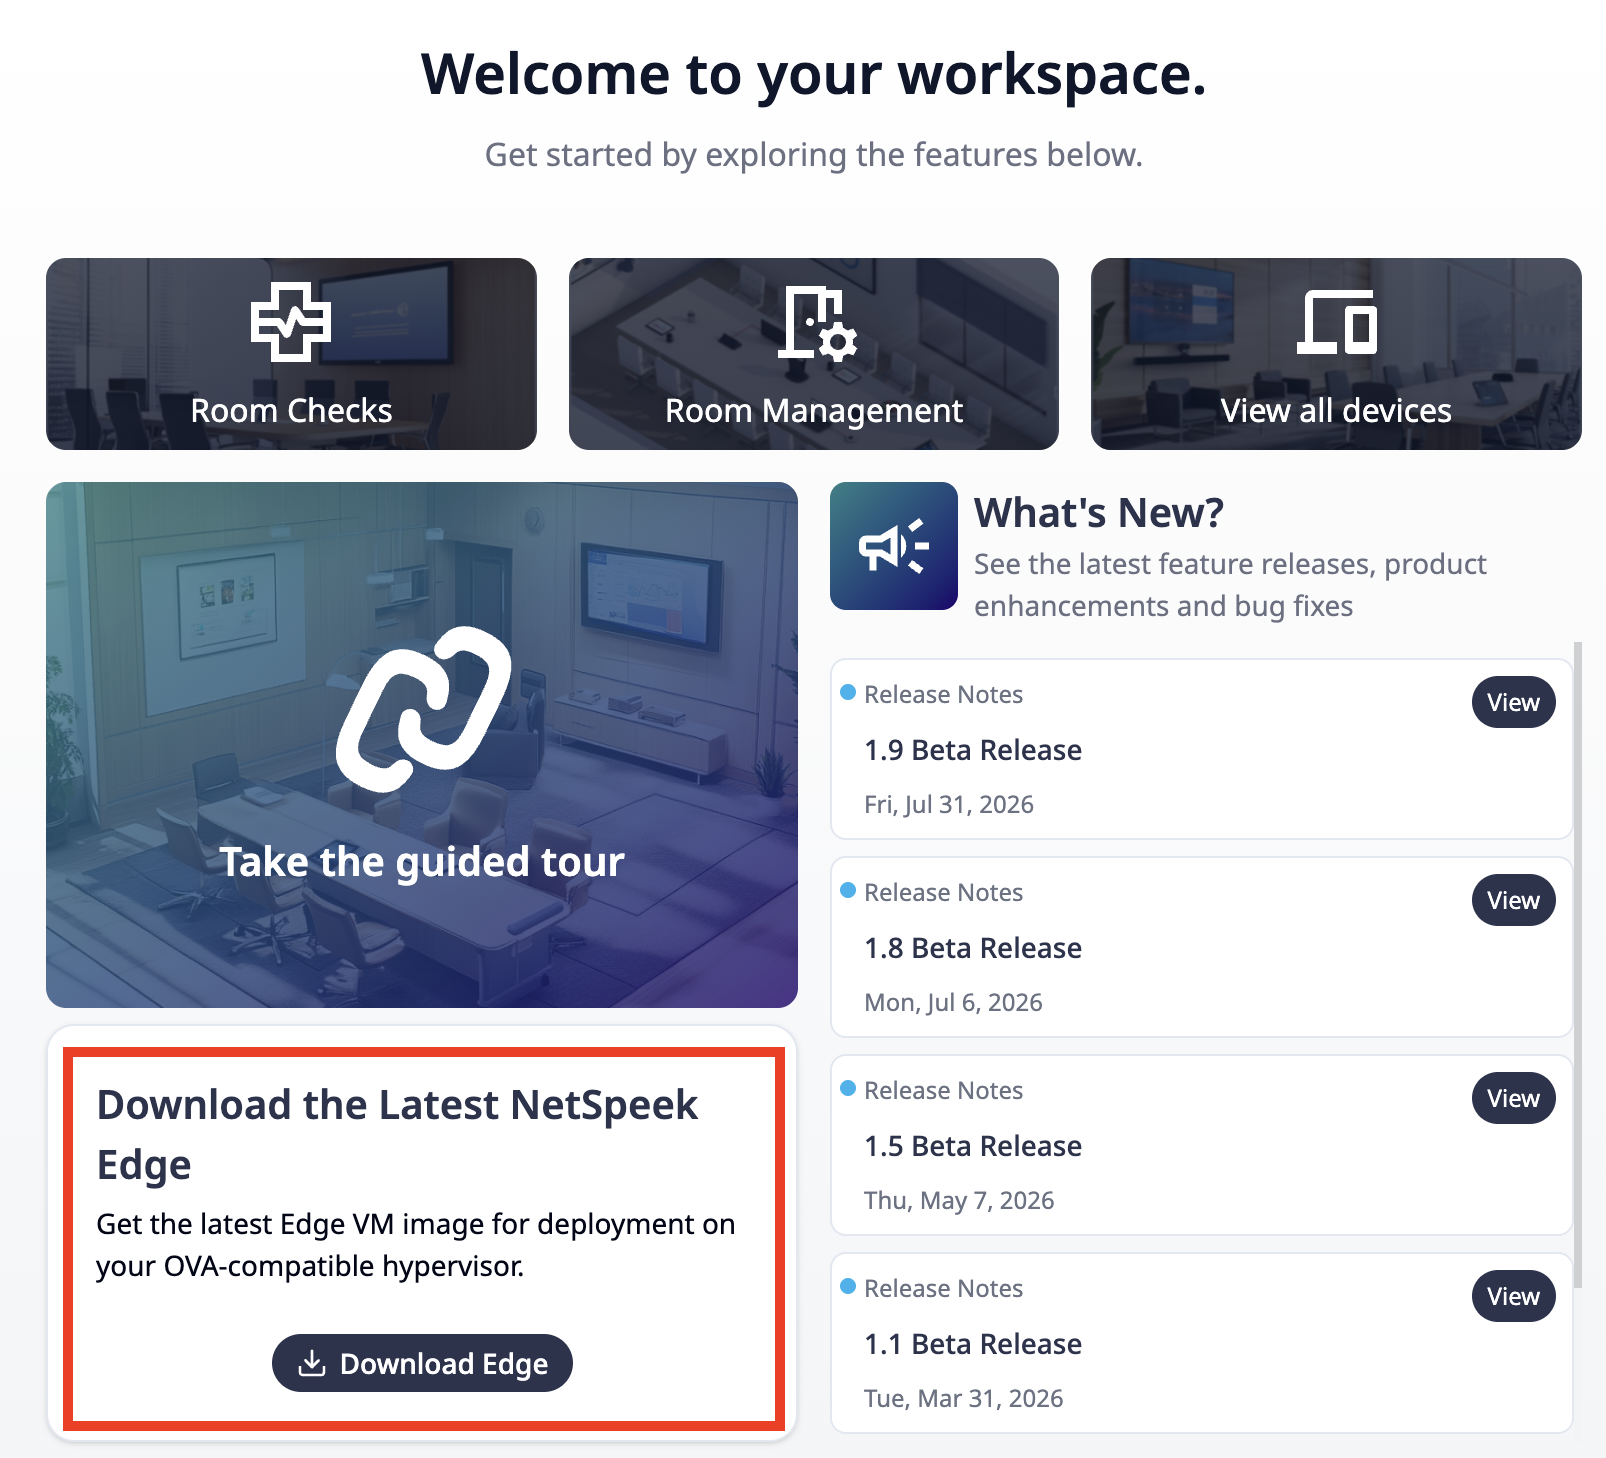
The ensuing workflow guides you through creating and downloading your Edge VM deployment files in .ova format.
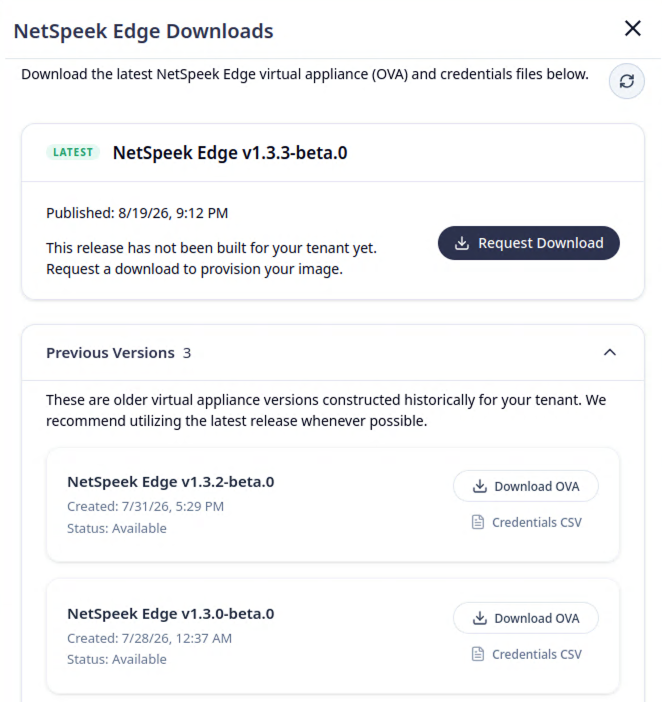
You may encounter an interface and message similar to the one below upon initially entering the Edge Downloads workflow. Click the Request Download button if you are presented with one – the process of generating the OVA file and credentials file generally takes less than 5 seconds. Click the Refresh icon shown in the image below if the download interface does not automatically refresh in your browser. (Previous OVA and credentials files generated in your tenant are shown in case a rollback to a prior Edge VM release is desired.)
After the download has been requested, or if another user in your tenant has already made the initial request to create the files, you will an encounter an interface like the below.
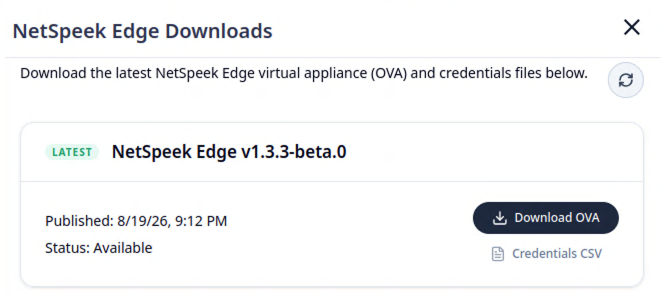
Download both the OVA file and the corresponding Credentials CSV file. You will need the credentials to complete setup of the deployed Edge VM in Step 4.5 below.
Note
Updates to the Edge VM are delivered as over-the-air (OTA) updates after initial deployment, so new functionality is delivered automatically and it is not necessary to repeat this process in most scenarios. Simply ensure the Network and Firewall Requirements related to OTA updates are permitted, and the Edge VM will maintain itself.
3. Network and Firewall Requirements
To reduce the length of the Edge Install Guide, and so that network administrators can view a single page focused exclusively on connectivity needs, the information about the Edge VM’s connectivity requirements is found at: https://docs.netspeek.ai/onboarding-and-platform-usage/network-and-firewall-requirements/
Installers should be aware that the Edge VM has no default IP address, and will request network connectivity information from a DHCP server by default. If installing the Edge into a network environment with no DHCP server available, it is required to set a static IP address using the procedure described at: https://docs.netspeek.ai/netspeek-edge-installation-guide/configure-netspeek-edge-with-static-ip-address/
4. Connection to NetSpeek Platform
1. Deploy the Virtual Machine
Import the NetSpeek Edge VM .ova file into your virtualization platform (e.g., VMware ESXi, VirtualBox, VMware Fusion, VMware WorkStation Professional, Nutanix, Proxmox, Amazon EC2, or other hypervisors that support the Open Virtual Appliance format). Specific steps vary slightly by hypervisor, but in general the process is to simply follow the hypervisor’s OVA-compatible Import Virtual Machine (or similar) workflow, and select the .ova file downloaded in Step 2.
2. Power on the VM
Start the virtual machine and access its console or terminal. At the terminal login prompt, enter first the username, and then, when prompted, the password from the credentials file. To discover the IP address assigned automatically to the Edge VM by your network, enter the command ip a. (See the following step for more network connectivity details.)
3. Configure VM Network and Firewall for Cloud Connectivity
Set a static IP address or use DHCP to ensure the VM has reliable network access. Confirm that it can reach the internet and your internal network. Configure the hypervisor and/or host to allow required inbound and outbound ports through its firewall (see Network and Firewall Requirements), NAT, and any host-level hypervisor settings. Ensure internet connectivity (primarily outbound HTTPS on TCP port 443) is permitted for the Edge VM’s communication with the NetSpeek platform. Verify DNS servers, gateway, and any network configurations on external equipment (eg upstream firewalls) are properly configured to support connectivity.
4. Navigate to the VM’s IP address
On your host or another device on the same network as the Edge VM, open a browser and navigate to:
http://<vm-ip>:8080
Note
If your browser defaults to HTTPS (which requires certificate-secured connections to websites), you will need to manually specify an HTTP URL, including the port 8080, precisely as described in the example above. The NetSpeek Edge VM’s local web UI does not support HTTPS connections to the web UI in order to avoid browser compatibility problems with self-signed certificates.
Taking the HTTP and port 8080 requirements together to construct an example URL, if your VM has been assigned the address 10.1.2.3 your login URL would be:
http://10.1.2.3:8080
5. Log into your NetSpeek Edge VM’s web interface for initial configuration
Using the IP address above, navigate to NetSpeek Edge Service Management login, input your passcode and Sign In to access the web interface.
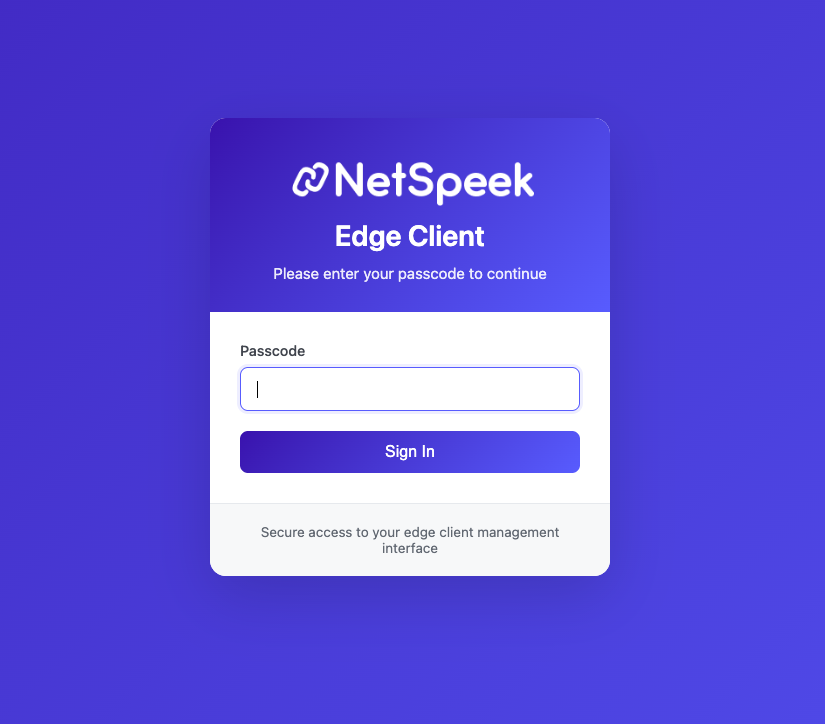
The tenant-specific unique password for your Edge VM is contained in the Credentials CSV file downloaded during Step 2. NetSpeek advises changing this password upon initial login, and documenting and rotating the password according to your organization’s policies.
6. Create API Key, and Confirm API Connection Health
The web interface lets you verify that your NetSpeek Edge VM is running correctly and provides tools to generate API Keys for connectivity to the NetSpeek platform, view logs, manage services, and confirm platform connectivity.
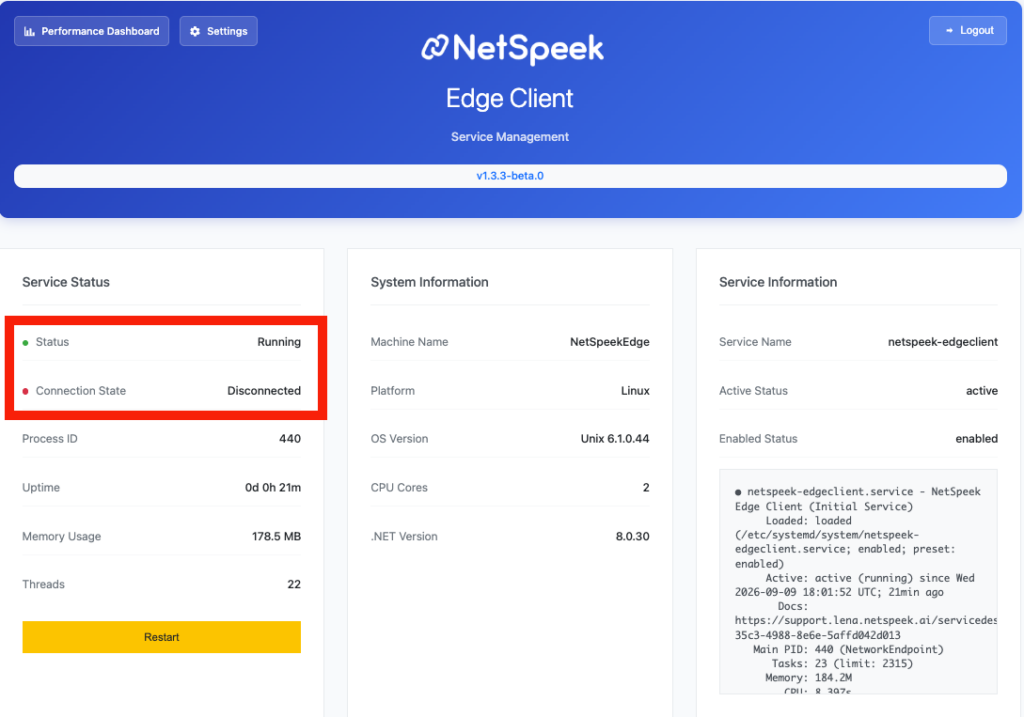
Upon initially logging into a newly-deployed Edge VM’s web UI, there is no API Key in place yet so the Edge VM cannot connect to the NetSpeek platform. As a result, it is expected that the Connection State highlighted in the image below will be “Disconnected” during initial setup until an API Key is generated, applied to a NetSpeek tenant, and the Edge VM’s onboard services are restarted. Said another way – “Disconnected” is the normal and expected status at this stage, and does not indicate a problem.
It is generally advisable when completing the next steps to have two browser tabs open – one logged into the Edge VM’s web UI, and the second logged into the NetSpeek tenant where the Edge VM will be registered.
6.1 – Generate an API key on the Edge VM / Rotate Password
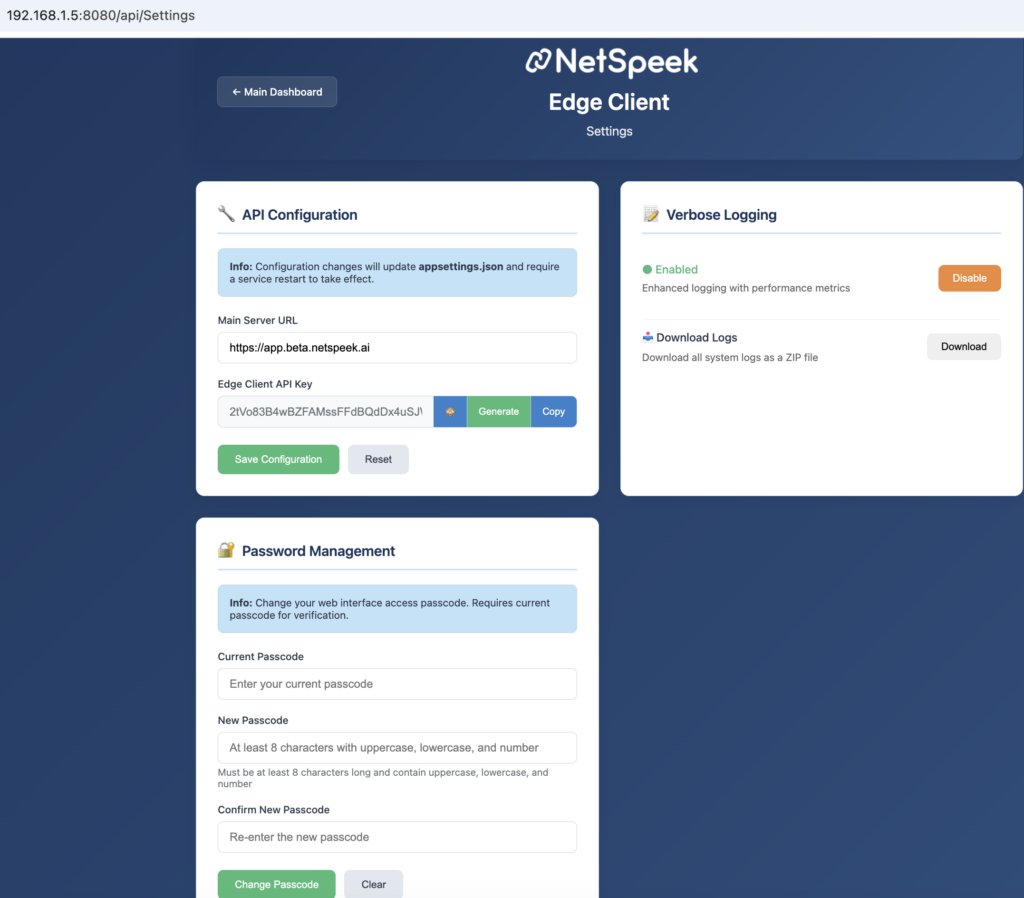
In the Edge VM web UI’s homepage/dashboard (shown in the prior image above), click the Settings button to access the interface shown below. By default, the API Configuration section will have a Main Server URL populated (in most situations this should remain unchanged) but the Edge VM API Key value will be empty. Click “Generate” to create an API key for this Edge VM to use, then click “Copy” to prepare to enter the key into the NetSpeek platform in the next step (6.2).
The Password Management section can be used to replace the original web UI passcode with one an administrator chooses. NetSpeek recommends changing the original passcode and recording it according to your organization’s policies.
Click “Save Configuration” before leaving this interface.
Note
After generating a new NetSpeek Edge VM API Key, make sure the API Key is copied to your clipboard (or stored according to your organization’s policies) and pasted into your Integration settings in your NetSpeek platform tenant before pressing “Save Configuration” and navigating away from this page.
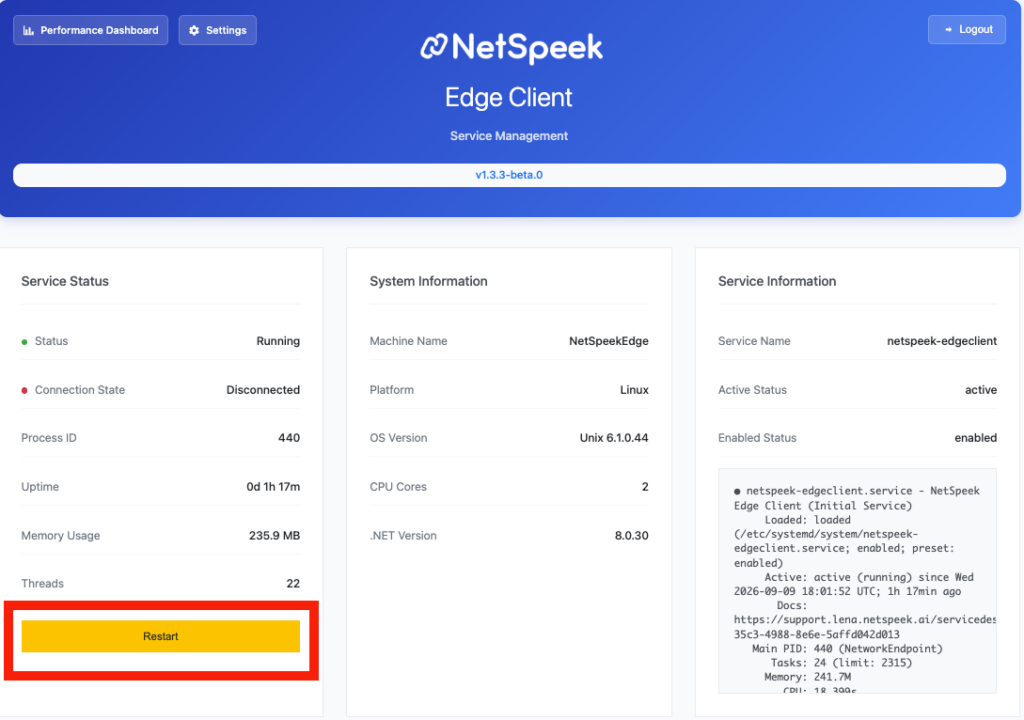
Also note that a newly generated (or replaced/changed) API Key will not be used by the Edge VM software to connect to NetSpeek’s cloud until the “Restart” button is pressed on the Service Status section of the Edge VM web UI homepage (this button is shown in the image in step 6 above, and further highlighted in step 6.3 below).
6.2 – Apply the API Key to your NetSpeek Tenant’s Integrations
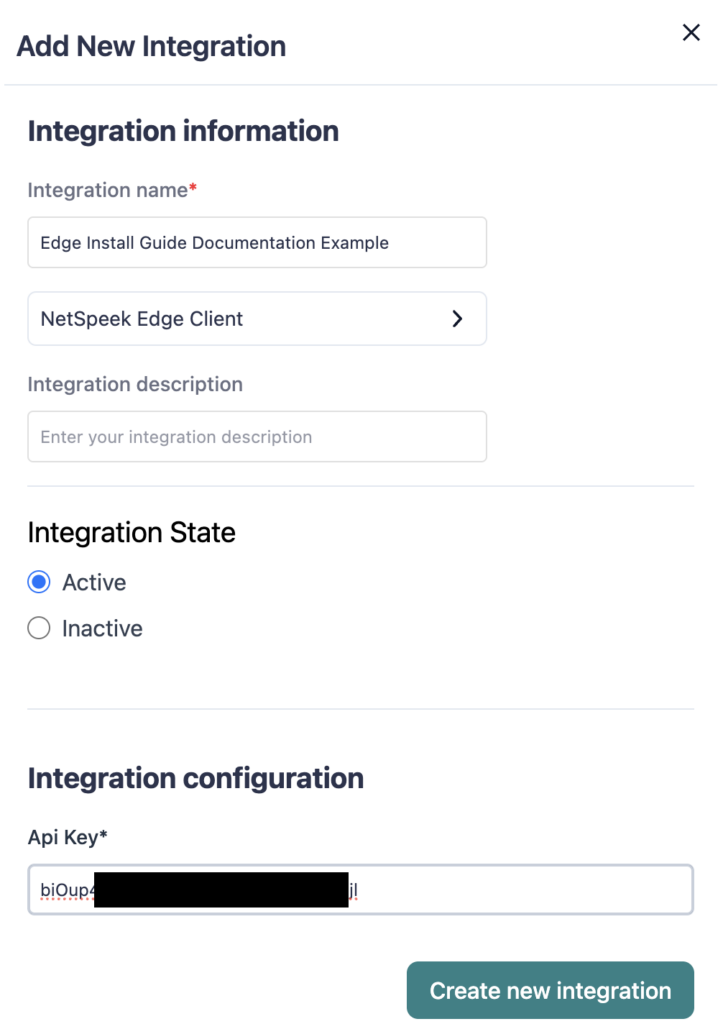
Create a NetSpeek Edge integration in the NetSpeek platform (under your tenant’s integrations list), paste the API key from step 6.1 into the interface as shown below, and click “Create New Integration“. The process to replace an API key for an existing integration is similar – just delete the old key, paste the replacement, and click “Update Integration to save the changes.
6.3 – Restart Edge VM from web UI and verify connectivity
After the above steps are done (API Key created and saved on the Edge VM, API Key pasted and saved in the web portal), restart the Edge VM’s services (using the main dashboard’s restart button highlighted in the image below) and verify Connection State changes to Connected (this may take a few moments to change, as the Edge VM needs to verify connectivity to the NetSpeek platform before changing the status).
If the status does not change after a few minutes, confirm the API key matches in both the Edge VM and the web portal, and ensure network connectivity between the Edge VM and the NetSpeek platform is available.
Addendums – Performance Dashboard, Other Settings, Installation Checklist, Troubleshooting
7. Edge VM Performance Dashboard
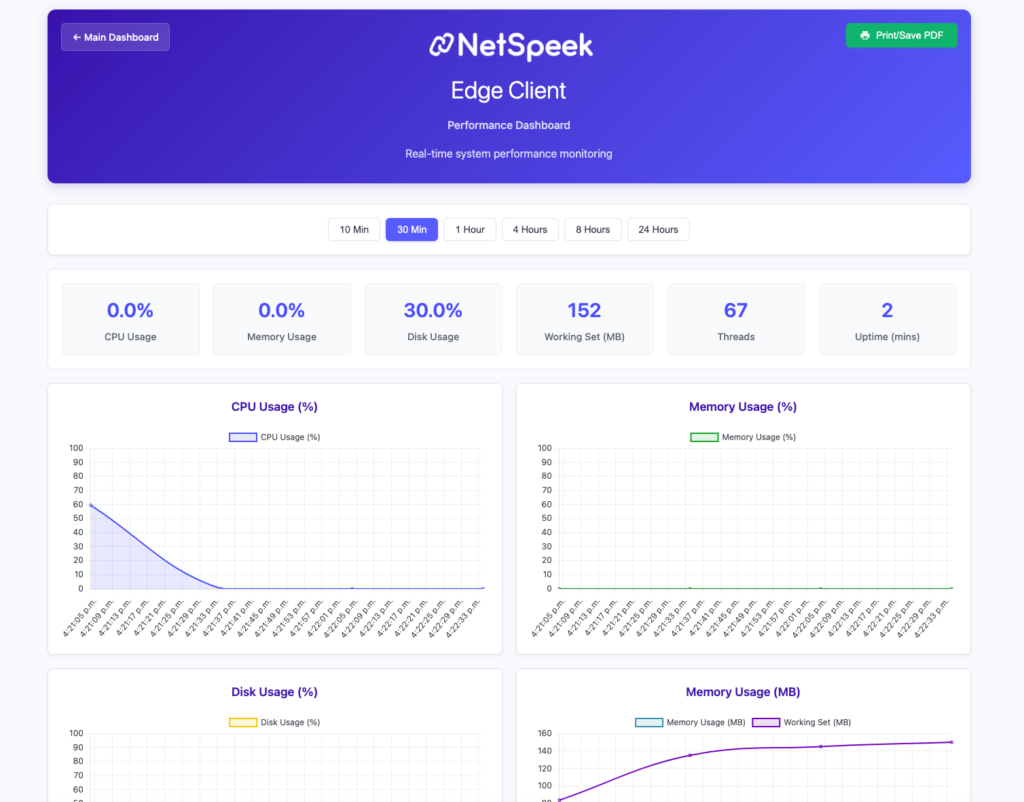
The Performance Dashboard provides incremental visibility into NetSpeek Edge VM’s resource utilization, including CPU, memory, and disk usage, along with other key performance metrics. You can adjust the reporting window to view metrics over different intervals, such as 10 minutes, 30 minutes, 1 hour, allowing you to monitor system health and ensure the VM is operating normally.
8. Other Edge VM Settings
The Settings Dashboard allows you to manage configuration options for NetSpeek Edge VM. From this view, you can update API settings, adjust password management controls, and enable or disable verbose logging as needed.
9. Installation & Resource Readiness Checklist
| Task | Status |
|---|---|
| OVA file and Credentials CSV image downloaded | ☐ |
| NetSpeek Edge VM deployed and powered on | ☐ |
| IP/network configured | ☐ |
| Firewall rules updated | ☐ |
| Password changed, new password stored according to your organization’s policies | ☐ |
| Edge VM successfully registered with NetSpeek platform | ☐ |
10. Troubleshooting
| Issue | Possible Cause | Resolution |
|---|---|---|
| “Connection refused” when accessing Edge local web UI | Firewall blocking traffic, or other network connectivity problems | Ensure network path is available to the Edge VM’s IP address |
| DNS resolution failures | Incorrect DNS configuration | Update DNS settings on hypervisor host, or Edge VM’s local settings if using manual static IP configuration |
| Slow performance, High CPU or memory usage | Insufficient resources | Allocate more vCPU/RAM |
| Edge VM fails to obtain an IP Address | Network configuration/permissions on local machine | Ensure DHCP is server is available, then try running ‘sudo dhclient’ in NetSpeek Edge VM console (if network connectivity has been corrected after initial setup) |
Support
If you encounter problems deploying or registering your NetSpeek Edge VM, contact NetSpeek Support at support@netspeek.com with:
- Edge VM logs (Collect NetSpeek Edge Logs)
- The name of the tenant you are using
- A description of the problem encountered and troubleshooting steps attempted